| |
| Our Choice of Accessories |
|
|
|
When we first started, we didn't
have a clue what we were doing! |
 |
In the beginning we talked
with other riders (in person and on the web) and
learned from them. We tried lots of things,
experimented, and customized our bike to make it
truly ours.
It is our hope that this page will be helpful to
those of you that are searching for input like
we were. As of this writing we have around
10,000 miles on
our bike and are still learning, fine tuning,
and making it even better!
We started out with a few of the items below, but most
we added as time went by. The more we rode, we
learned what we liked and what we didn't. A big
part of that was our own self discovery;
figuring out what type
of bike riding we enjoyed most (see:
Finding "Your Thing"). We then looked
for what accessories would improve that
experience. This page contains information
on what items we chose and why. |
|
| |
|
| Pedals |
|
|
We had never tried
them before, but when we got the bike we had them
install clipless pedals. Then of course we got the special
shoes to go with them. We absolutely love them!
From a couple sources, I had heard the recommendation
that they were especially good for the "stoker" (back
seat rider on a tandem). The reason was that if
the "captain" (front rider) needed to stop suddenly, or
hit a bump without warning the stoker, their feet could
slip off the pedals. The other reason for getting
them is that it allows us to pull as well as push and
thus get much more power as we ride (especially nice
on hills). The pedals we chose have a clip for the
shoe on one side, and a regular flat platform on the
other side (Shimano PD-M324, see the picture below). When I ride in a stop and go
situations, like a downtown area, I stay on the platform
side. Once I get out on a longer stretch I clip
in. The stoker stays clipped in the whole time
just as the passenger on a motorcycle keeps their feet
up the entire ride. We did have the same pedals
installed on the back anyway, so when we
give other people rides they can use the platform side
of the pedal. We definitely recommend them!
The shoes we chose look like walking shoes (made by
Specialized). The
clip on the bottom (once installed) is recessed so when
we take a break on one of our rides for lunch or
shopping we can walk around without a problem. |
   |
| |
|
| Helmets |
|
| We found a particular
bike helmet we really like. It is the
Bell Metropolis. It has a place on the
back to attach a flashing light and is designed
for a rain cover that
just snaps on. The cover is great, not just for
rain but it really helps keep your head warm in
the cooler weather! |
  |
|
| |
|
| Cargo
Space |
|
 |
One challenge we
have always faced is just how to carry all
the things with us that we want to take on our
rides (check our "Riding Tips" page for things we
recommend taking along). When we first got
the bike we included the yellow "tailpack" from
the maker of the bike (left). We soon
found that we needed even more space. We found this
black case on the web
made by a company called
Otivia.
It is a lockable hard shell case that only
weighs two pounds. It was originally
designed for recumbents so the width is
the same as our seat. It has a surprising
amount of room inside. On the days we rode
to work, I took my laptop computer back
and forth in safety! We are very happy with
it.
I had to do a little bit of modification to get it
bolted on to my particular rack, but not too bad.
It also makes a good place for our web address!
(For a LOT more cargo space... check our
Touring Page) |
|
| |
|
| Tires |
|
|
We were not very happy
with the standard tires that came on the bike.
The original stock tires were 1-1/2 inch wide and ran at
100psi, basically rock hard and the ride felt
like it. It was especially apparent with
the 20" front tire. We considered putting
a suspension front fork on the bike to improve
the ride, but I could only find one on the
market that was rated by the manufacturer for a
tandem (others are used on tandems, but not with
the blessings of their makers). The
initial cost and maintenance requirements of
that fork were both high. I was told
before jumping in that direction to try the 2
inch "Big Apple" tire by
Schwalbe
(top). It has a maximum rating of 70psi,
so it is still quit hard
with good rolling resistance, but when you do hit a
bump they flex much more than the stock tires. We noticed a
substantial improvement on the very first ride! They
also have Kevlar belts to resist punctures.
Ah yes, the other reason for changing our tire
choices... flats. I got so tired of flats,
especially on the back tire, that I went looking
for other options. I found the "Marathon
Plus" tire also by
Schwalbe
(bottom). It has a foam layer (the
blue) between the
tread and the tube, just in case anything gets
through the Kevlar belts. An object would
have to be longer than a quarter of an inch to reach the tube.
We chose this tire in a 1-3/4 inch width for the
back tire. It also runs at 70psi, so it
has good rolling resistance. Only two flats in
5,000 miles of riding, when we ran over long
nails. We were
so pleased with its performance on the back, we
eventually put one on the front as well.
We lost a little bit of our soft ride going from
the 2 inch Big Apple to the 1-3/4 inch Marathon
Plus, but no flats was worth it. We still
have a much better ride than we did with the
original 1-1/2 inch tire. |

 |
|
|
|
| Chainrings |
|
 |
We rode with the original factory supplied
chainrings (front set of three gears) for two years. In most of our
riding there was no
problem. However up steep hills we never
felt like we had a low enough gear. There
were times when we really needed a good "granny
gear." We
would be straining hard and yet unable to keep the RPM
at a decent rate. The standard set of chainrings that come on the
Screamer are: 55, 44, and 32 teeth. (I
wonder if the fact that the Rans factory is
located on the plains of Kansas has anything to
do with it.) After a ride one day with a lot of
climbing, I started looking into changing the
gearing. I discovered that when the
Hostel
Shoppe builds there own version of the
Screamer, they had already figured this out.
For their "Ultimate Screamer" they get the frame from Rans then install their
own list of components. On that bike they use chainrings
of 53/38/26 teeth. I copied that on my bike,
and it is fantastic! I now have the equivalent
of about two gears lower than my old lowest
gear. It makes all the difference on the steep
hills! |
|
| |
|
| Steering
& Idlers |
|
 |
I discovered an awesome resource.
It's a company in Portland who makes top
quality parts for recumbent
bikes. Builders of "high-end"
bikes around the globe
use their products. |
|
 |
I replaced the flex stem on my bike (circled
in blue to the right) with one made by
TerraCycle.
I hadn't been happy with the amount of slop in
the steering column on my bike. After
talking to several people, someone recommended
checking with TerraCycle. Their product is
amazing. The quality is so far superior to
the stock equipment that comes on most all
recumbents. The first ride after I
installed it made me a believer! I
can definitely endorse it. Because of the
great feedback on this product, some bike
manufactures are now installing them in the
factory. I eventually ended up replacing
the mast and handlebars with TerraCycle
equipment also.
|
|

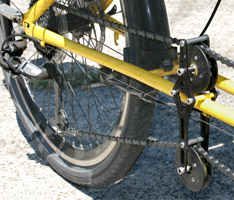 |
Other TerraCycle modifications are the chain
idlers. They make replacement idlers for
most recumbents with superior bearings that
improve performance. The best way I can
describe the difference is that the whole drive
train feels much smoother. The two stock
front idlers are replaced with one, located
farther forward on the bike (far left).
The rear pair take the place of the stock set in
the same location. |
|
|
|
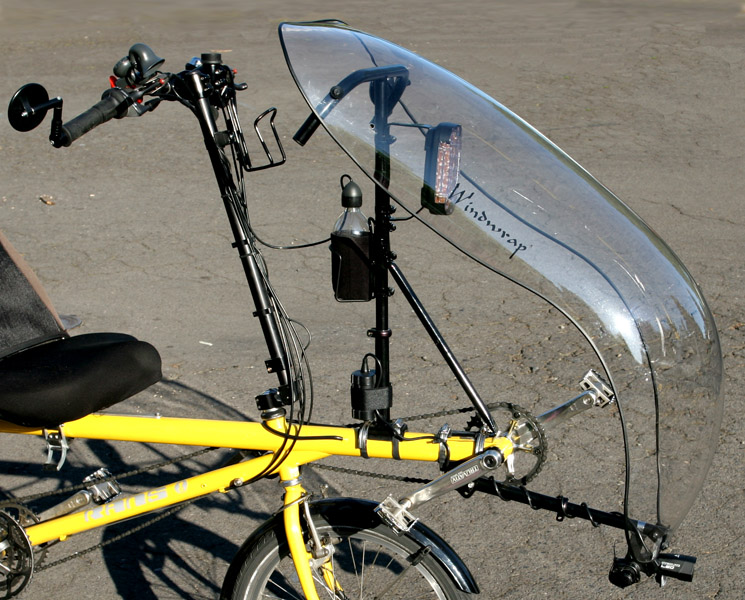
| Fairing |
|
|
We added a Windwrap Fairing
(now also made by TerraCycle). Since getting the bike I had considered a
fairing. One
of my reasons for hesitating was that wind
tunnel tests show that you don't really gain
much aerodynamic advantage until you are above
20 mph. We don't often exceed that unless
we are going down hill. Well, I wasn't
thinking that the speed is "air-speed" not
"ground-speed." If you are riding at 15mph
into a 15mph headwind, the aerodynamic effect on
the bike is 30mph! Since adding the
fairing, I have noticed three changes: we
accelerate much faster going down hill, it is
much easier riding into the wind, and my legs
stay dryer in the rain. I love it!
To add stability, especially on rough roads I
added a diagonal brace to the front of the "T"
holding the fairing. (You can click on the
picture to the right to see a larger version.) |
 |
|
|
|
|
Lights
- "see and be seen" |
|
 |
I think we get more comments about our lights
than any other single item on our bike.
We're always looking
for better ways to make ourselves more visible. I added these flashing lights
front and rear. The rear light really is
as bright as a car's tail light! Other
riders regularly tell us that it's the brightest rear bike light they
had ever seen. The lights are called
"Foxfire" made by
Marpac. I actually purchased them from
Columbus
Supply, they were a little less expensive
than buying them from the manufacturer. I
did have to fabricate my own
bracket since they are not designed for bicycle
use (lower set of pictures). They come with
magnets on the back, which I removed. I
used the existing screws to attach to my
brackets. On Marpac's website, they now
offer one that fits on the seat stem of an
upright bike, but that doesn't help us "bent"
riders. The lights run on 4 AA batteries each (I
use rechargeables).
I also have a stock high
intensity light mounted below the fairing
(above) to help
me see the road at night. |
|
| |
|
| Beverage
Holders |
|
|
One thing we talk about on our
"Riding Tips"
page is making sure you have plenty of water
with you on long rides. Most bikes are not
equipped with a sufficient number of places to
install water bottle cages. I have seen
riders come up with some very creative solutions
on where to mount additional cages. On our
bike we have places for 7 bottles (three on each
side and one in front). Even at that, on our longer rides
we have to stop and refill them! In the
picture to the right, two of the cages use
factory mounts on the back of the seats.
The one toward the back of the bike is mounted
on the rear seat support with hose clamps. |
 |
|
 |
A couple years ago we discovered
Polar Bottle, insulated
water bottles. I don't know if you have
had this experience. Before you leave
home, you load up your bike with plenty of
bottles so you can stay properly hydrated on a
long ride. By the time you
get to bottle number three, it's lukewarm and
you can hardly force yourself to drink it even
though you're thirsty. At first I was a
bit skeptical that this bottle would really work
but now I'm a believer, it works great! Here is the
trick, fill the bottles part way with water and
put them in the freezer the night before.
Top them off with water when you leave in the
morning. Two hours later you will still
have ice cold water! You have to
experiment, too much ice and it won't have
melted when you want to drink it. The 24
ounce bottle (which we bought) is taller than a
regular bottle so make sure you have space on
your bike. You can find them at most bike
shops (local and online). |
|
|
Okay, I admit this must be a real Northwest
thing, combining bicycle riding and drinking
good coffee! We have always enjoyed
heading to our favorite local coffee shop for a
latte'. Once we started riding the bike on
a regular basis, it meant riding to the coffee
shop and sitting there while we shared a cup.
When we rode the bike to work,
we wanted to find a way to pick up our coffee
and take it with us! I found these at
The Bike
Gallery in Portland. They're called:
"Trek Soho Commuter Mugs" (made by
Trek).
They are stainless steel insulated coffee cups. The really cool thing about these cups
is that
they actually fit into a standard water bottle
cage! That's the reason for the unique
shape. |
 |
|
| |
|
| Horn |
|
 |
As well as being seen,
we like to be heard also. There are times
when you need to make your presence known.
We actually have three different "noise makers."
We start out with a nice friendly bell. A
nice little "ding-ding" is usually all it takes
to get someone's attention as you approach them
from the rear on the bike trail. If that
doesn't work, we have a bulb type "ah-ooooga"
horn. If that fails, we use our "Airzound"
air horn. It's as loud as a car horn!
You pump it up with your bike pump, and get an
ear piercing blast. We don't need it
often, but it has come in handy. I once
blasted it at a driver who cut us off, and it
was loud enough that they turned around and
looked back to see what it was! It's
available lots of places, I ordered mine online
from the
Hostel Shoppe. |
 |
|
| |
|
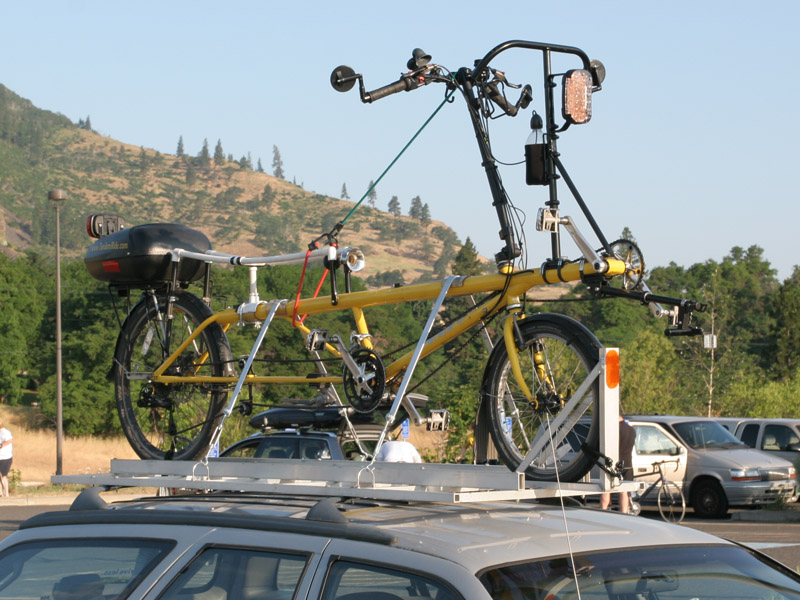
| Rack |
|
| The first year we had the
bike, all of our rides had to start from home.
Our motivation to get some kind of rack was a
desire to join in some organized rides.
Naturally we had to be able to get the bike to
the starting point of those rides! There
are some bike racks on the market designed for
tandems, but none that I was happy with when
used with a tandem recumbent.
So I built my
own. I no longer have the car in the picture,
but I still use the same rack. I bolt it into
the bed of a small utility trailer that I tow
behind our car. For construction I used all
aluminum and stainless steel so I wouldn't have
to worry about corrosion. The frame is square
tubing with a channel for the tires to sit in.
The bike is held on with flat bars bent in a "V"
with turnbuckles on each end hooked to u-bolts.
To keep from scratching it, I put pieces of
rubber tubing over the bike frame . The white
PVC pipe thing on top is to hold the seat
supports steady while the seats are off during
transport (in the trailer I leave the seats
on). I remove the fairing while traveling to
prevent damage by the wind at freeway speeds. |
 |
|
|
Accessories related to touring are
on the Touring
Equipment page. |
|
|
|
|
|